¶ Xero Integration
¶ Table of Contents
- Pre-requisites for the Integration
- Integrating Marmin with the respective Xero Account
- Resolving Data Syncing Issues between Xero and Marmin
- Syncing and Creating ZATCA-Compliant Invoices from Xero
- Creating Different Invoices Based on Different Types of Customers
- VAT Categories
- Creating Export Invoices
- Syncing Invoices to Marmin
- Technical Data Flow & Error Handling
- FAQs
¶ Pre-requisites for the Integration
- You need to have at least one business profile and bank added to your Marmin account.
- The email IDs on Marmin and Xero should be the same.
¶ Integrating Marmin with the Xero Account
- Log into Marmin:
- Go to Settings.
- Navigate to "Organization Settings" under Settings.
- Xero Webhook Integration:
- Navigate to the section "Xero Webhook Integration."
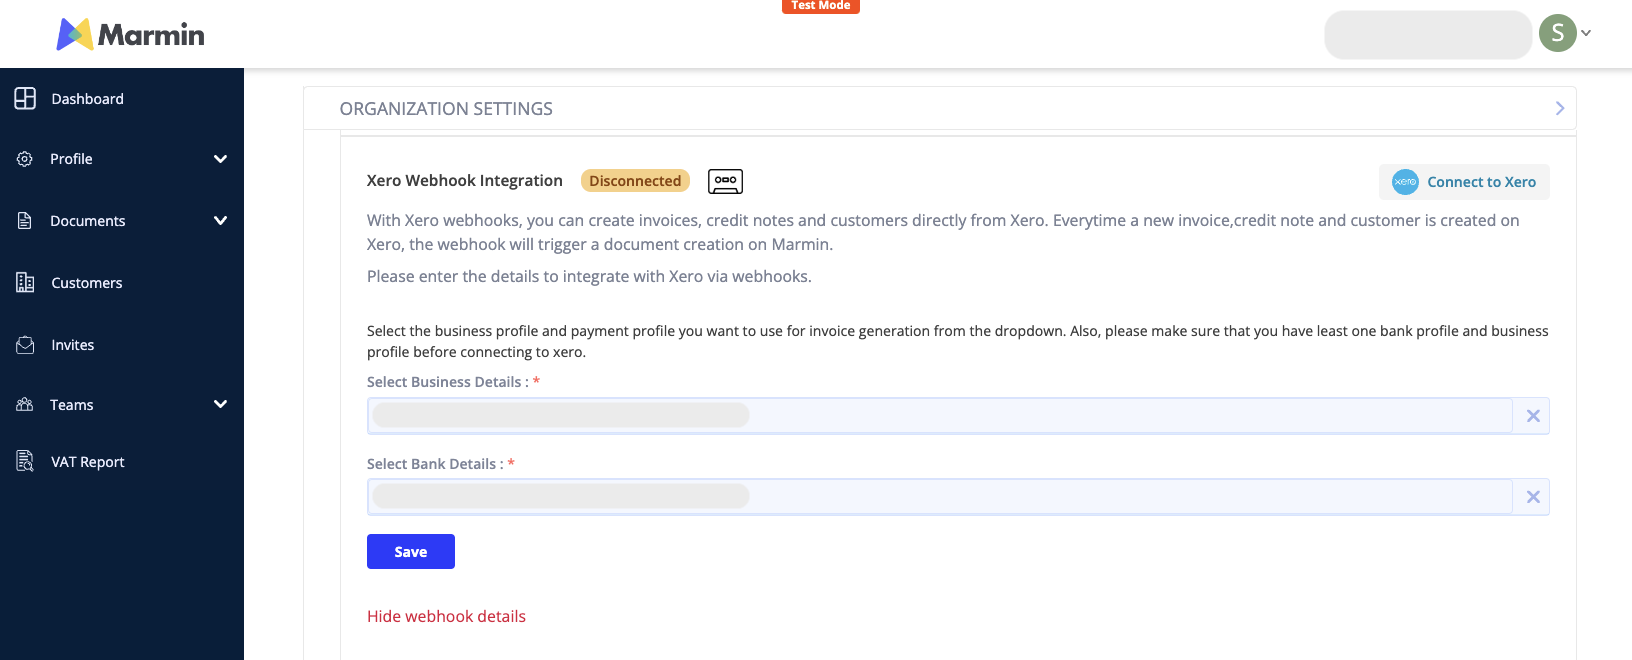
- The status will show "Disconnected."
- Select the business profile and bank that should be selected by default for the invoices being synced from Xero. This can be changed later if needed.
- Click on "Connect to Xero."
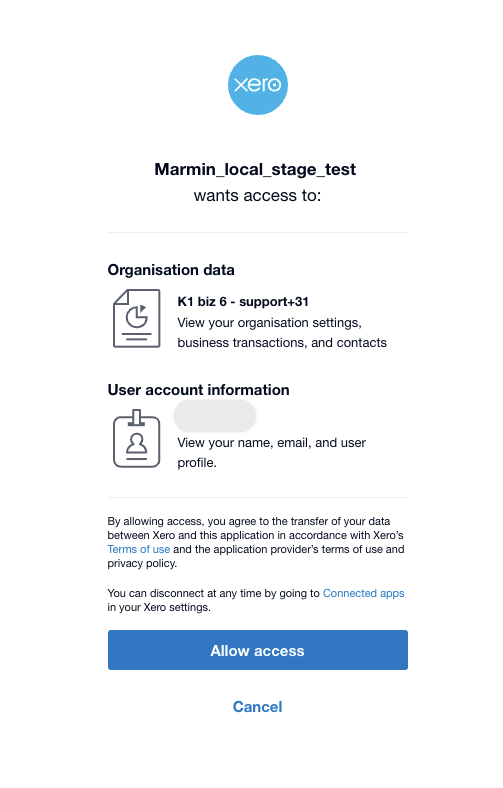
- You will be redirected to Xero to allow access to the respective organization to sync data to Marmin.
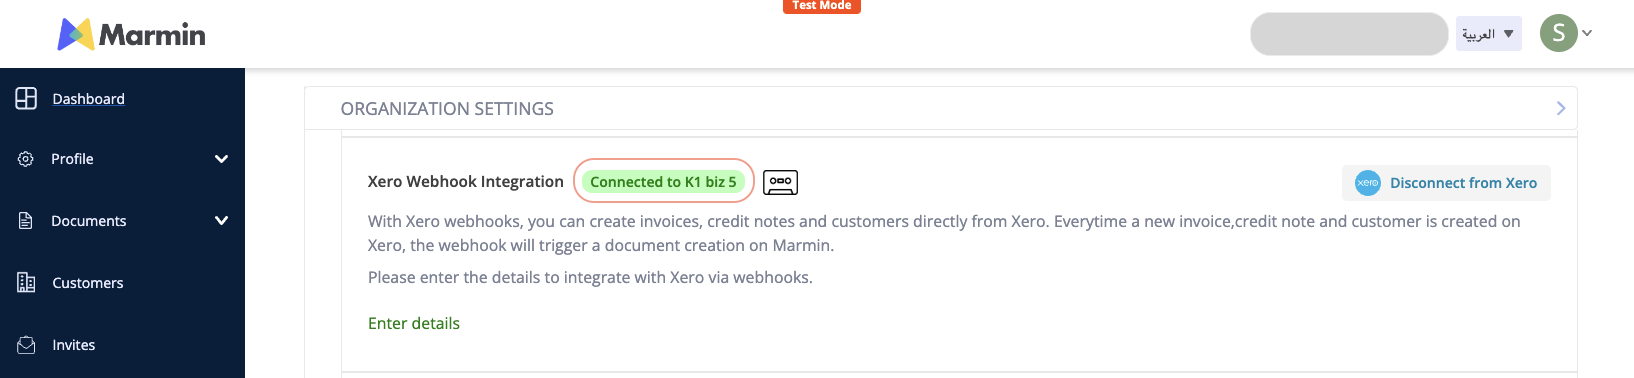
- Once access is granted, you will be redirected back to Marmin, and you will see the connection status as green, indicating the Xero organization that has been linked.
With this integration, customers and invoices/CNs created on Xero will be synced in real-time to Marmin.
¶ Resolving Data Syncing Issues between Xero and Marmin
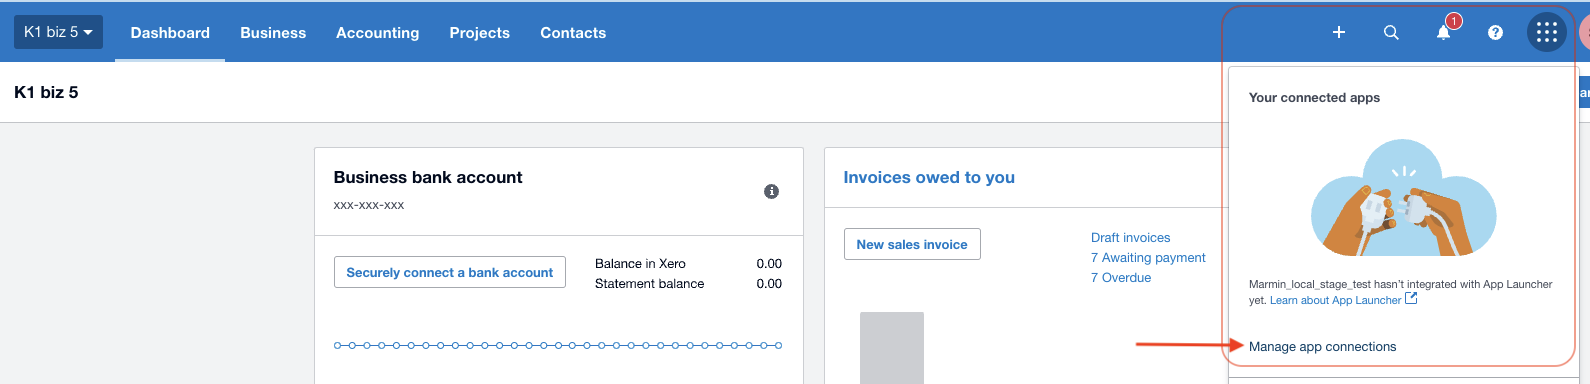
If data is not syncing between Xero and Marmin, begin by checking the integration status on both platforms. Navigate to the integration screens in both Marmin and Xero to verify that the connection is properly established and active. Refer to the screenshots below for guidance.
If the connection is not established on either platform, disconnect from the platform and reconnect by following the steps outlined in the previous section.

¶ Syncing and Creating ZATCA-Compliant Invoices from Xero
To sync invoices from Xero to Marmin, you will need to ensure that the buyer/customer created on Xero have all the necessary details required for creating a compliance invoice.
- Ensure the following fields are provided for the customer on Xero to create compliant invoices. Below is the mapping between Marmin and Xero:
| Xero | Marmin Data Fields |
|---|---|
| Contact name | Company Name |
| Primary person (First name + Last name) | Name |
| Phone number | Phone Number |
| Business registration number | CR number In case of a non-Saudi customer, this will be considered for Other ID |
| Address line 1 | Address Put the entire address in Address line 1 |
| Address line 2 + Address line 3 + Address line 4 | - |
| City | City |
| State | State and District The same value is mapped to both State and District on Marmin side since Xero doesn't provide the option for two separate fields |
| Zip code | Postal Code |
| Country | Country |
| Tax ID number | VAT number (needs to follow KSA VAT guidelines) Leave this blank for a B2C customer |
¶ Creating Different Invoices Based on Different Types of Customers
The table below represents the types of customers and how Marmin will interpret the customer.
|
Saudi Customer Saudi Phone Number |
Non-Saudi Customer Non-Saudi Phone Number |
|
|---|---|---|
| Tax ID number and Business registration number both are present | B2B customer | NA |
| No Tax ID number, only Business registration number is present | B2B customer | B2B Export customer |
| Tax ID number and Business registration number both are NOT present | B2C customer | NA B2C export is not allowed with ZATCA |
Notes
- The phone number is used to identify a Saudi or non-Saudi customer.
- For example, when a customer created on Xero doesn't have a VAT and/or CR number and the phone number is a non-Saudi phone number, then the customer will be an export customer and the invoice will be an export invoice.
- If the customer is a local Saudi customer and the VAT rate is zero, it can be Z, E, or O. However, we default the VAT category to O while creating the invoice in Marmin, as Xero doesn't provide an option to add the VAT exemption code, which is mandated by ZATCA.
Here are the various combinations of different data points and what invoices will be created along with Tax categories
| Phone Number | VAT | Other ID | Customer | Invoice type | Invoice Transaction Code | Tax received from Xero | Tax received from Xero |
|---|---|---|---|---|---|---|---|
| 15% | 0% | ||||||
| SA | No | No | B2C | B2C with local address | 0200000 | S | O |
| SA | Yes | No | B2B | B2B normal with local address | 0100000 | S | O |
| SA | No | Yes | B2B | B2B normal with local address | 0100000 | S | O |
| Non-SA | NA | No | B2C | B2C with foreign address | 0200000 | S | O |
| Non-SA | NA | Yes | B2B | B2B export | 0100100 | S | Z |
VAT Categories
When creating invoices in Marmin, it is crucial to select the appropriate VAT rate to ensure accurate tax application. Follow these guidelines to align the VAT rates set in Xero with those applied in Marmin:
- Standard VAT Rate: Assign a VAT percentage of 15% for standard transactions. The label or name you assign to this VAT rate in Xero does not affect its application in Marmin, as long as the percentage is correctly set.
- Export Invoices: For invoices intended for export, use a VAT rate of 0%. This ensures that no VAT is charged on goods or services sold outside the domestic market.
Creating Export Invoices
To properly generate export invoices in Marmin, you need to consider the following steps:
- Select an Export Customer: Begin by ensuring that the customer for the invoice is designated as an export customer. For guidance on how to set up export customers in Marmin, refer to the section titled Creating Different Types of Customers.
- Apply the Correct VAT Rate: Always select a VAT rate of 0% for export invoices to comply with tax regulations for goods and services sold internationally.
¶ Technical Data Flow
When you create a new invoice, credit note, or customer in Xero, a technical process begins to sync the data to Marmin and submit the e-invoice to ZATCA. Marmin's queuing mechanism ensures that all events from Xero are captured and processed without being missed.
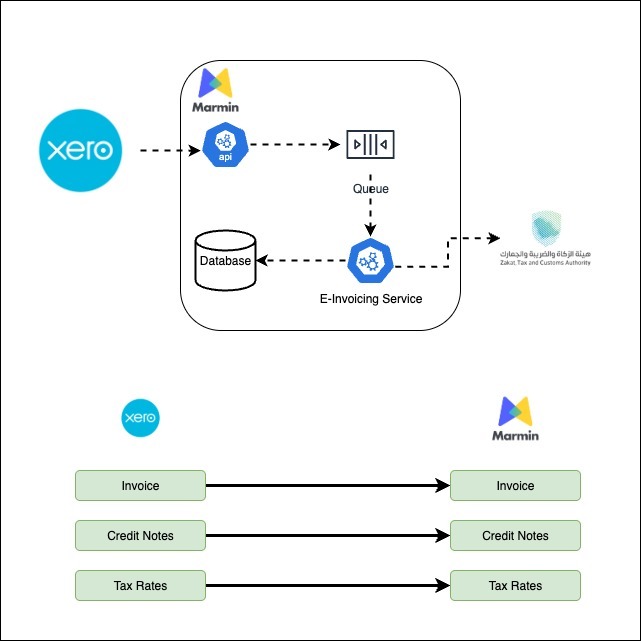
Here is a step-by-step look at how the data flows:
- Webhook Trigger: Every time a new invoice or credit note is created in Xero, a webhook is triggered that informs Marmin about the new event.
- Data Retrieval: Marmin receives the event and then requests the full invoice data, including buyer information, directly from Xero.
- Queuing: Once the data is received, the invoice is added to a processing queue. This queue ensures that all requests are handled in an organized manner.
- E-Invoice Generation: The e-invoicing service in Marmin picks up the invoice from the queue and generates the e-invoice. This process includes creating a Invoice Counter Value (ICV), the Previous Invoice Hash (PIH), and a Universal Unique Identifier (UUID).
- Signing & Submission: The generated e-invoice is digitally signed and then sent to the Zakat, Tax and Customs Authority (ZATCA) for validation.
- Data Storage: The e-invoice data is securely stored in a Marmin database, with data localization in mind.
- Post-Submission Actions:
- Accepted by ZATCA: If ZATCA approves the document, the e-invoice is automatically emailed to both the seller and the buyer.
- Rejected by ZATCA: If the document is rejected by ZATCA, an email notification is sent to the seller.