¶ Website: E-invoice and E-CN/DN Creation
Now that we have done the basic set-up, you can start issuing invoices to your buyers.
The Marmin application provides users with the capability to create invoices and notes directly within a web browser. Additionally, users can seamlessly view invoices that have been successfully generated through integration with the Sabre system.
The image below emphasizes key elements within the web interface for end-users of the e-invoicing platform:
- Invoices
- Credit Notes
- Debit Notes

¶ Filtering on the Listing Pages
Filtering the invoice or notes you are looking for is very easy. There are standard filters like status, document type, and invoice start date that you can apply.

You can also add sub-filters using the sub-filter icon. Whenever a sub-filter is added, the same will show up as a filter on the screen.

You can also do a free text search based on the document number, customer details, and even the item description in the document/s.

¶ Invoice Creation
Go to the Invoice page under the Documents section. You will see multiple ways of creating an invoice
- Manual invoice creation
- Bulk upload of invoices
- Creating invoices from either Purchase order, Sales order or Proforma invoice
In this section, we will talk about the manual creation of invoices. Click on the + Create Invoice option. From the options, select either Standard or Simple invoice based on whether you want to create a B2B or B2C invoice, respectively.

Fill in all the necessary data, along with selecting business profile, customer, and bank details from their respective dropdowns. Once all the details are filled in, Save the invoice. As soon as the invoice is saved, the invoice will be sent to ZATCA for validation. The invoice PDF can only be downloaded once we have received a positive confirmation from ZATCA. If yours is a Phase 1 account, then you will be able to download the invoice immediately along with the QR code.
¶ Invoice With Advance Payment
When there's been an advance payment against an invoice, it must be included in the actual invoice to ensure accurate Amount Payable and VAT liability. Simply record the advance collected as a separate line item. To do so, select the "+ Add Advance Payment Item" option when creating the invoice.


¶ Advance Invoice
There are instances where there is advance payment against a future invoice. The same needs to be declared to ZATCA as an advance invoice.
This can be done by simply toggling the Is Pre-payment Invoice to YES while creating an invoice. The rest of the process for invoice creation will continue as-is.

¶ Credit and Debit Notes
Once an e-invoice is generated, it cannot be changed. Any changes to an invoice have to be made via a Credit or Debit note.
¶ Issuing a Credit Note (CN) or Debit Note (DN)
Follow the below process to issue a CN/DN
- Open the Invoice Listing Page: Navigate to the invoice listing page in the Marmin system.
- Select More Actions: Click on "More Actions" for the desired invoice and choose either "Raise Credit Note" or "Raise Debit Note."
- Verify Pre-filled Details: You will be redirected to the CN/DN creation page with all the details pre-filled based on the original invoice.
- Specify Reason for Issuance: Choose the appropriate reason from the standard list mandated by ZATCA.
- Enter Actual Value in Line Items: For example, to issue a 20 SAR refund on an item worth 100 SAR, enter 20 SAR. Marmin will calculate VAT and other details automatically.
¶ Standalone Credit Notes
When the original invoice wasn't created on Marmin and you need to issue a refund, you can issue a standalone Credit Note (CN).
Follow these steps to issue a Standalone CN:
- Navigate to the CN Listing Page: Open the CN listing page in the Marmin system.
- Raise a Credit Note: Click on 'Raise Credit Note.'
- Select Credit Note Option:
- For B2B transactions, select "Standard Credit Note."
- For B2C transactions, select "Simple Credit Note."
- Fill in the required details:
- Enter the invoice number and invoice date of the original invoice. These fields are mandated by ZATCA.
- Complete the remaining details as necessary.
- Save the Standalone CN: Click 'Save' to generate the Credit Note.
This process allows you to issue refunds for invoices not originally created in Marmin while ensuring compliance with ZATCA requirements.
¶ Draft Invoices and Approval Workflow
¶ Overview
For some businesses, issuing invoices without an approval process can lead to errors, especially when regulatory constraints, ZATCA Phase 2 integration, limit corrections to credit notes only. To mitigate this, our platform supports a draft invoice workflow: invoices can be created in a draft state, reviewed, and approved before being finalized. This ensures accuracy and reduces the need for issuing credit notes due to mistakes.
Key Benefits
- Reduced Errors: Catch and correct invoice details before final issuance.
- Streamlined Approval: Automatically route draft invoices through multiple approval levels.
- Regulatory Compliance: Minimize the need for credit notes by ensuring invoice accuracy prior to creation.
¶ Setting Up Approvals
Configure Approvers:
In Settings, add approvers in the desired approval order. For example, if your process requires three sequential approvals, add them in the exact sequence they should occur.
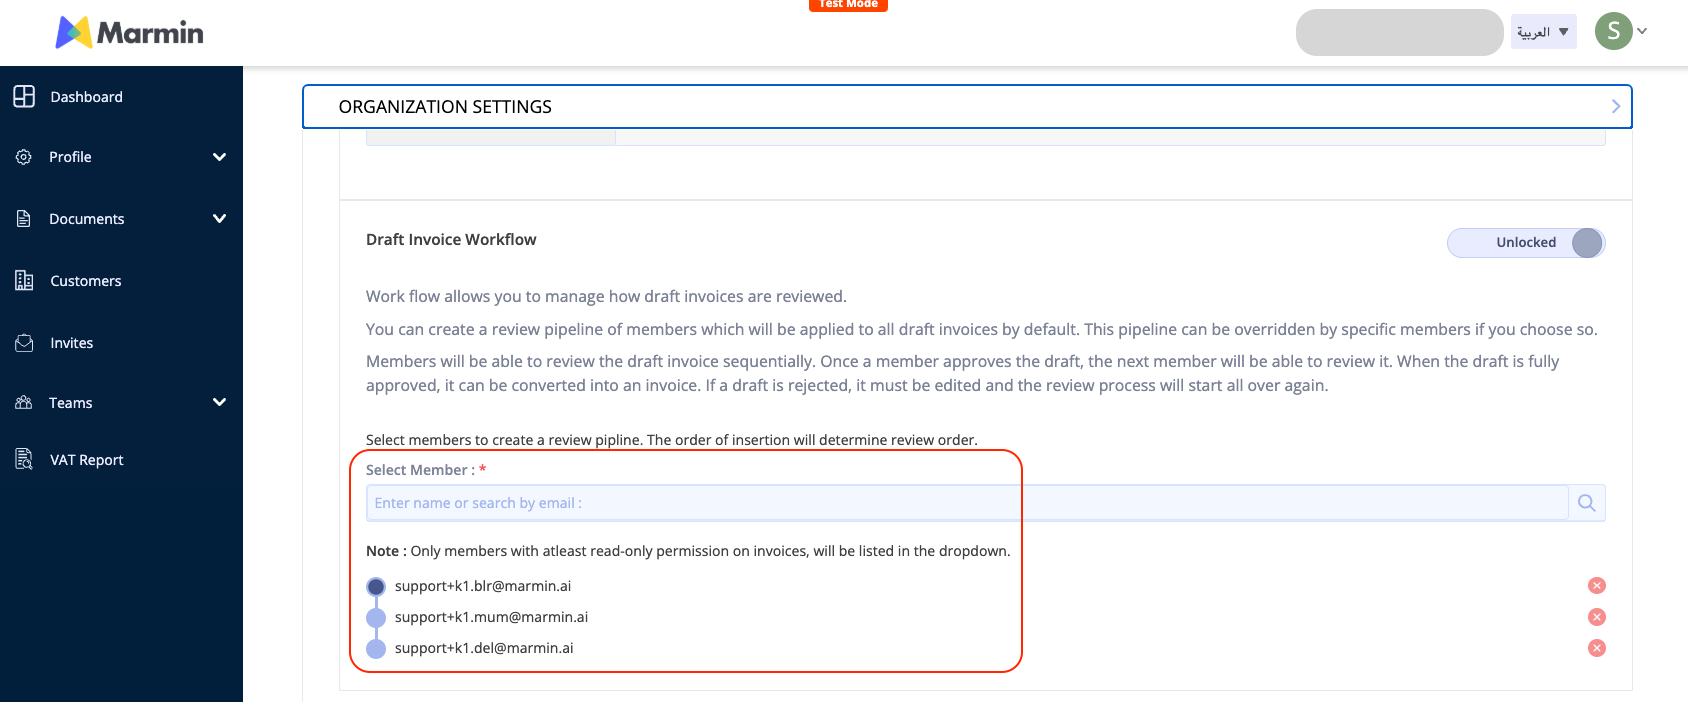
Saving the Workflow:
Once the approval sequence is set, the system will follow this order whenever a draft invoice is submitted.
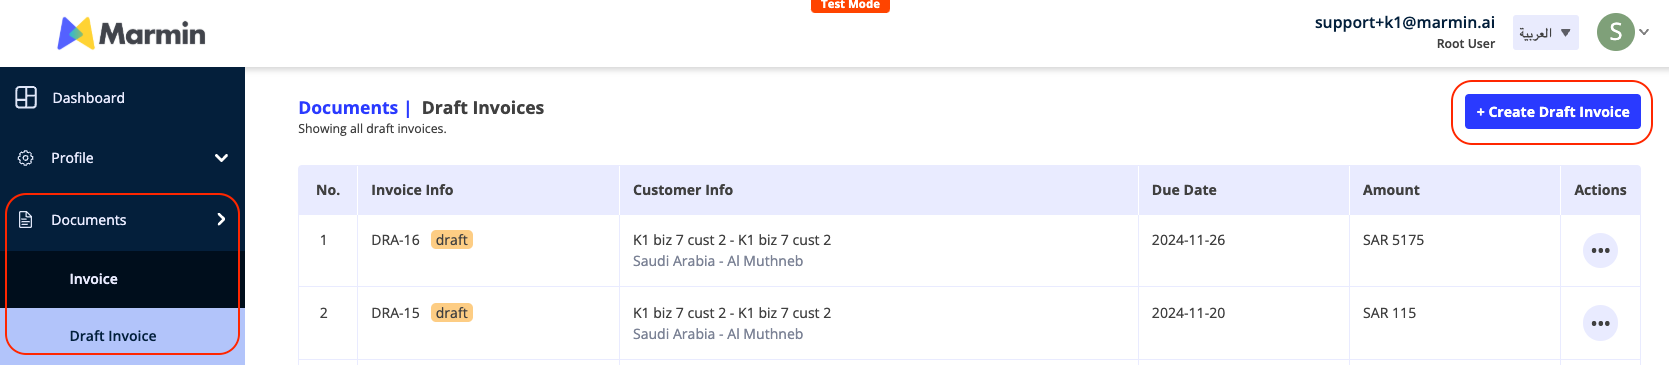
¶ Creating and Processing Draft Invoices
Create a Draft Invoice:
Navigate to Draft Invoices and create the invoice with the necessary details. Do not use the standard invoice creation path if you intend to use the approval process.
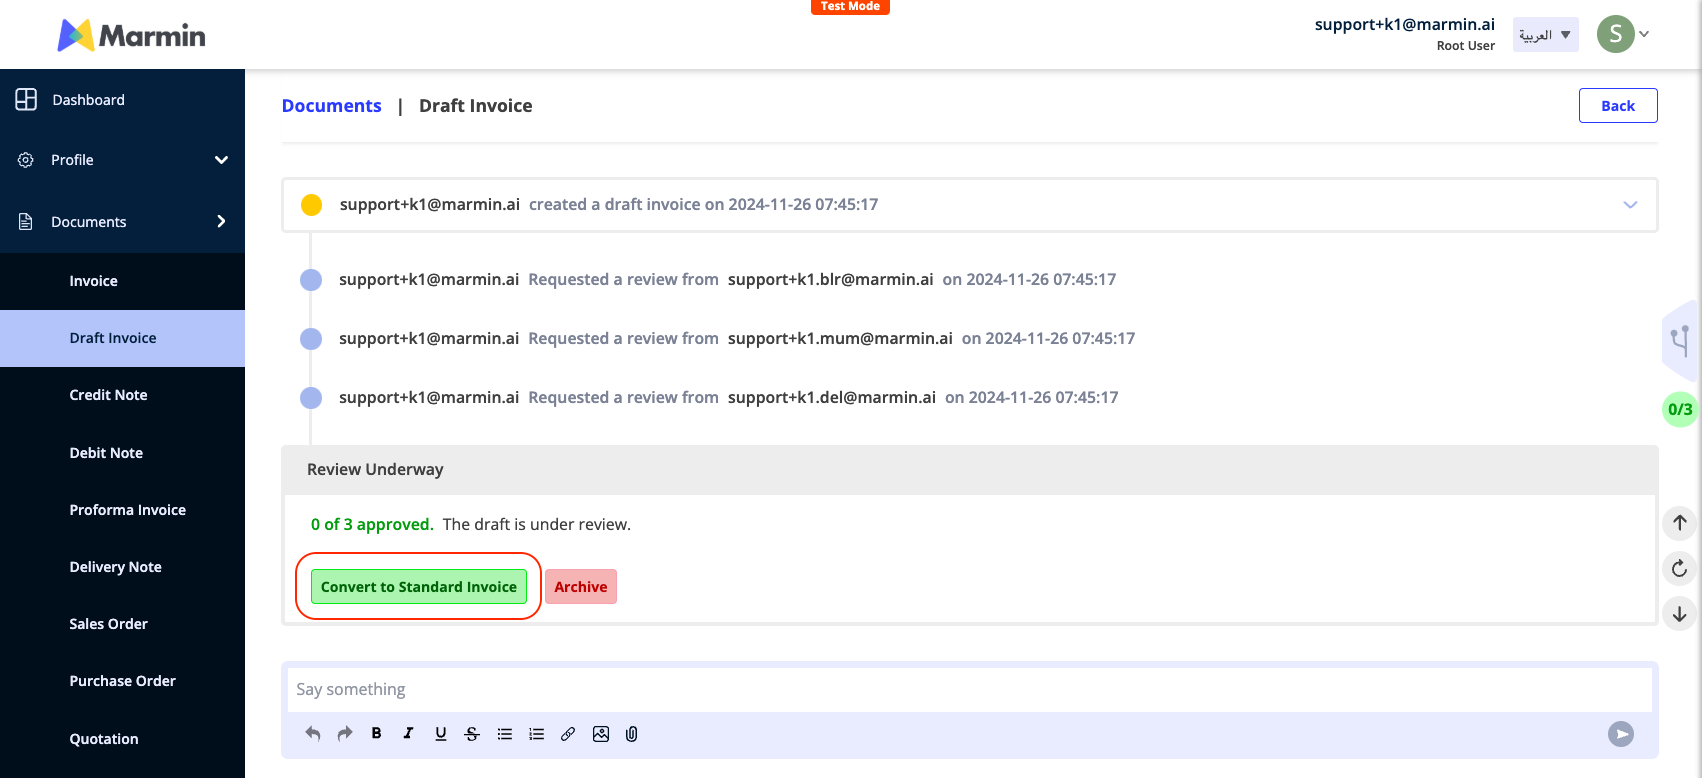
Automatic Notification to Approvers:
Upon saving a draft invoice, the first approver receives an automated email with a link to review the invoice.
Approver Actions:
- Approve: If the invoice is correct, the approver confirms it. The system then sends it to the next approver in the chain.
- Reject with Comments: If corrections are needed, the approver can add comments and reject. The system sends these comments back to the invoice creator, who can revise and resubmit the draft.
Finalizing the Invoice:
After all designated approvers have approved the draft, the invoice creator can select Convert to Standard Invoice. This action finalizes the invoice. If your account is integrated with ZATCA Phase 2, the final invoice is automatically submitted to ZATCA.
¶ Managing Document Numbering
¶ Automatic Document Numbering
To save time and prevent duplicate document numbers, Marmin allows you to automatically generate sequential numbers for your invoices, credit notes, and other documents. You can also customize the prefix and starting number for each document type.
This feature is controlled by the Root User.
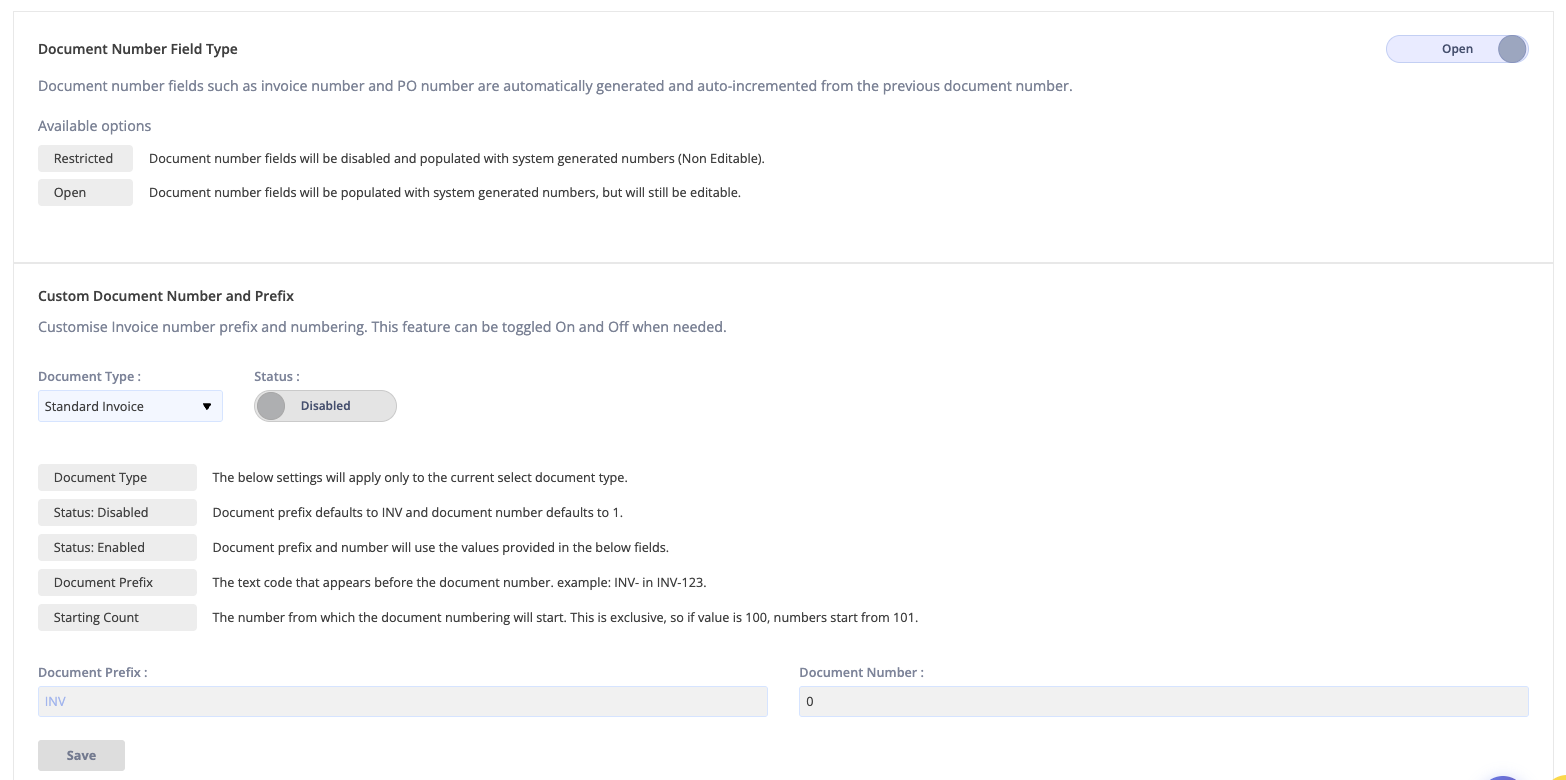
¶ How to Enable Automatic Numbering
- Navigate to Settings in the left-side menu.
- Under the User Settings tab, find the option
Document Number field type. - Select the "Open" option.
- Once this is enabled, Marmin will automatically assign the next number in the sequence when you create and save a document.
¶ How to Customize Your Document Numbers
For each document type (e.g., Invoice, Credit Note):
- Enable Customization: Turn on the toggle for the document type you wish to customize.
- Set a Custom Prefix: In the
Prefixfield, you can change the default text (e.g., changeINV-toACME-INV-). - Set a Starting Number: In the
Starting Numberfield, enter the number you want the sequence to begin from. For example, if you enter1001, the first invoice generated will be[YourPrefix]-1001.
Remember to click "Save" at the bottom of the page to apply your changes.